
 Tulips are used as the design motif on a large variety of Tiffany Studios shades. Sizes for tulip shades range from 14" to 22". Due to the multitude of colors which these springtime flowers come in, the palette for shades is practically endless.
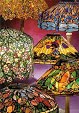
We have been working on a 22" Tulip shade for a local client. The flower colors for this lamp are an impressionistic blend of reds, oranges, purples, yellows and peach tones. Even with the multiple flower colors, the overall tone of the lamp is lighter and not heavy. A variety of greens have been chosen for the lush foliage.
 In the photo to the left, Bill is seen laying out the cut and fit flower pieces on the glass palettes. To the right, Irwin is foiling a completed section.
The layout for this shade pattern has three repeats, but because of the complexity of the pattern and size of the shade, it is difficult to see the repeated section when the lamp is put together. One foiled section is shown below.
 Large floral shades like this 22" Tulip take many weeks to complete. Much time and care is spent on the complicated layout of colors which bring the pattern to life.
  Once the glass has been cut and fit to the pattern, the construction of the shade takes a considerable amount of time and patience. In the photo to the left, Irwin is seen soldering on the outside of the shade.
The completed lamp is shown on the impressive Turtleback base (see photo at the top). This bronze reproduction base was created by our studio using molds taken from an original Tiffany Studios example. The heavy base can be used with many different large shades from 22" to 28".


