Monday, March 30, 2009

16" Acorn Shade

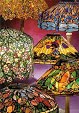
Recently, we have been making a number of geometric shades, including several Acorn lamps. The Acorn design works in most interiors because of the simplicity of the pattern and the multiple color combinations that the shade can be created in. As a testament to the continued popularity of the 16" Acorn design, since 1986 we have created 34 examples of this shade pattern. While "Acorn" was not the original name for this pattern, it has become the accepted moniker by dealers and collectors when referencing this pattern today. The shade was called a Vine Border on the original Tiffany Studios' price guides, which is evident by the heart-shaped leaves in the border.

During the past month, we made two 16" Acorn shades that went to opposite ends of the country. The first Acorn was an inverted chandelier fixture that went to California. The lush, green background was rendered in a heavily mottled glass and provided a deep backdrop for the rich amber acorns. The 3-chain reproduction fixture was created at Century Studios to the length specified by the client. It now adorns a breakfast nook.

The second Acorn shade was made for use as a table lamp. With a mixed blue/amber background and amber acorns, this colorful shade is lit by the Swamp Flower base. Created by Century Studios, the Swamp Flower base has a highly textured lower plate of bronze blossoms and stems. The rounded bronze body features water plants in low relief. The design of the base beautifully compliments and supports the shade. This lamp now resides in a home in Virginia.

Monday, March 23, 2009

A Visit to New York

This past weekend, we traveled to New York City for a whirlwind visit. Any trip to New York is not complete without seeing "something Tiffany", and this time we visited the Lillian Nassau Gallery at 220 East 57th Street on Saturday morning. As always, there were many wonderful Tiffany lamps, desk set pieces and blown glass items on display. Arlie Sulka chatted with us as we ooh-ed and aah-ed over the treasures. The gallery has been doing many shows lately, so we were fortunate to visit when the large stock of lamps was not on tour.

A piece that stood out in the gallery's current collection is a 27" Salamander shade on a Junior Floor Base (the photo is from www.lilliannassau.com). The glass in this impressive shade is appropriately hot and fiery. The flames look like they could scorch you if you got too near the piece.

The other is a very large and impressive blown glass Peacock Feather table lamp. Being close to four feet in height (if not over), this lamp can only be called a table lamp because it sits on a table (for a photo of a similar lamp, see Tiffany Lamps and Metalware by Alastair Duncan, p.37, pl.123). The lamp featured a large blown glass shade, an enameled collar with scarab beetles and an enameled apron at the bottom of the piece. Having only ever seen this piece pictured in books, it was a revelation to see it in person.

Monday, March 16, 2009

Renoir Window Part 3

Once all the glass was cut, fit, and each piece was wrapped by hand with copper foil, soldering the window could begin. We started by soldering the "main" layer to which the plated layers would be added. The photo at the right shows Irwin soldering on the front of the window.

This window has extensive plating on both the front and back surfaces. Care must to be taken to thoroughly clean each piece of glass to be used on a plating layer before it is soldered in place because the added layer is permanently attached to the window. The photo to the right shows the back of the panel with the additional face piece soldered in place.

The photo to the left shows a detail of the soldered window. The figure without additional plated piece of glass is pale because most of the coloration is put on the piece that is positioned on the back of the panel. On the right side of the photo, you can see the face with both layers in position (the background has yet to be double layered).

After adding all of the additional layers, the window was completed and mounted into a light box. The window was then crated and shipped to our clients in New York City. The completed window is pictured below.

Monday, March 9, 2009

Renoir Window Part 2

Impressionist images provide an exciting challenge for a stained glass artist. The use of light and the manipulation of color in an Impressionist painting is inspiring, and also a little daunting. To capture the feeling of the original, just the right glasses must be chosen. Since this style of painting usually consists of soft layers of color the first challenge is to "firm up" the image and then, through the use of the glass colors, to soften the finished window which will have hard black leadlines throughout.

Once the completed cartoon for this window was reviewed and approved by our clients, two more tracings were made and the pieces were numbered so that work could begin. The first tracing on white paper becomes the "blueprint" drawing, while the second numbered tracing on frosted mylar is cut into individual pattern pieces which we use to lay out the window.

To create this image by Renoir, we used three layers of glass plated together on the panel. Some of the plating was done on the front surface while more was added to the reverse side of the panel. Plating multiple layers of glass is a challenging prospect because every time another layer is added, the color, density, and intensity of the glass shifts and changes. Much time is spent working on the light table looking at different combinations of layered glasses. The photo to the right shows one plating layer on the light table. This layer looks ghostly on its own, but will be used to tint and tone the other layers of glass in the window.

The photo to the left shows a detail of the window with several of the plating layers on top of one another on the light table, but not soldered together. The face of the woman will still have more color added, and without the lead lines, the background lacks the definition it will have in the final window.

Monday, March 2, 2009

New Studio Update

Century Studios' new home is about to go Technicolor! We will begin painting the walls and ceiling of our new space this week. We are getting very excited to move in and get things set up, but there are many gallons of paint to be spread about before that can happen. Once we complete the painting, the moving can begin in earnest!

As you can see in the first photo on the left, the 16' glass rack has been completed at the back or our upstairs space with storage space above it. The photo to the right was shot standing at the back wall and facing the front of our space. We still have brown paper in our door and picture window at the front. The space should change dramatically this coming week as we add color to the walls and ceiling.